BI &
BW
Introduction to BI:


SAP BI/BW Topics
Basics of SAP , Business Data
Warehouse
·
Basic
SAP GUI Navigation
·
Data
warehousing Need – with an Example.
·
SAP
History
·
SAP
BW vs Other Data warehousing Tools
·
SAP
BW vs SAP BI
·
SAP
BW Terminology o Master Data o Transaction Data o Landscape
·
Areas
of SAP BW o Extraction o Modeling o Reporting
·
Data
Warehousing Categories
·
SAP
BW & EDW
·
2-Dimensional
Modeling o Multi Dimensional Modeling ( Star Schema ) o SAP BW Star Schema (
Extended Star Schema ) Administrator Workbench .
·
Administrator Workbench ( AWB ) {
RSA1 }
·
o
Info Area o Info Object Catalog o Info Objects ( Building Blocks )
·
Characteristics
·
Key
Figures o Application Component Area o Info source, Types – Flexible , Direct
·
PSA
( Persistent Staging ARea )
·
Source
System
·
Data
Source
·
Info
Package
·
Flat
file extraction ( Master Data ) o Extract
Structure o Transfer Structure
·
Transfer
Rules ( Types ) o Communication
Structure
·
Update
Rules ( Types ) o Data Targets
·
ODS
·
Info
Cubes, Types
·
Multiproviders.
Reporting
·
Business
Explorer o Bex Query Designer o Bex Analyzer o Restricted
Key Figure o Free
Characteristics o Filters o Variables o Calculated Key Figures o Navigation
Options o Customer Exits o SAP Exits
·
Extraction
o LO Cockpit ( LBWE )
·
Generic
Extraction ( Master Data Upload )
·
Web
Application Designer
·
RRI
( Jump Reports )
·
Solution
Manager
·
Transportation.
SAP BI ( Business Intelligence ) 7.0
– Data Modeling
·
Data
Warehouse Workbench Types of Data o Master Data o Transactional Data o Meta
Data Data Model o BI Master Data Tables o BI Transaction Data Tables o Star
Schema o Extended Star Schema o SID Tables o Structure of Dimension Tables o Dimension
Modeling BI Objects
·
Info
Area
·
Info
Object Catalog
·
Characteristics
/ Attributes
·
Attribute
Types
·
Time
Characteristics
·
Unit
Characteristics
·
Technical
Characteristics
·
Key
Figures Info Object Definition o Attribute
Types
·
Time
Characteristics
·
Unit
Characteristics
·
Technical
Characteristics o Key Figures Info
Object Definition.
Introduction to BI:
Business
intelligence (BI) is an application used for giving meaning to raw data that an
organization has. The raw data is cleansed, stored and applied with business
logics to be useful for enterprise users to make better business decisions.
This data can be presented in the form of reports and can be displayed in the
form of tables, charts etc. which is efficient and easier to analyse and make
business decisions.
During all
business activities, companies create data about customers, suppliers and
internal activities. Based on these data’s, employees of various departments
like HR,
Finance, Accounting,
Marketing etc. prepare their work plan.
Business
Intelligence spans a varied set of toolset, of which the Data Ware House
consolidates and loads the data from the different Source Systems, while
reporting tools like Query Designer, Web Application Designer, and Analyzer are
majorly used to create reports which display the data consolidated by the
Datawarehouse for analysing purpose.
Business
Intelligence is a SAP product which majorly focuses on providing its customers/organizations
with a user friendly and very useful form of representing data that could be
helpful for analyses purpose and making business decisions.


In
summary, Business Intelligence tools transform raw data into reports which used
for decision making and business forecasting.
Why do we need Data warehouse & BI?
Organizations
have different kinds of data such as finance, Human resource, customer,
supplier data etc., which can be stored on different kinds of storage units
such as DBMS, excel sheets, SAP R/3 systems etc...Even the company's internal
data is often distributed across many different systems and is not particularly
well formatted.
A Data
Warehouse can help to organize the data. It brings together heterogeneous Data
Sources which are mostly and differing in their details. Using BI Tools one can
derive meaningful reports
What makes
SAP BI more effective BI tool?
Single
point of access to all information is possible through BI. The data from
various sources can be accessed at the single place(i.e BI).
Data
collected from various sources are presented in the form of reports which is
efficient for analysis of the data at a high level.
SAP BI
provides easy to use GUI and better formatting
Some of
the key functionality that makes SAP BI better than rest is its ability to
analyze multidimensionaldata sources in both web and MS office
environments, flexible dashboards, mobility and a flexible, scalable BI
platform.
SAP BI is
known for its awesome query performance, while requiring little
administration
Mobile BI for
end users on the go
Easy
Integration with other platforms
SAP BI/
Data Warehouse Vs. OLTP systems:
OLTP(Online
Transaction Processing):
These
systems have detailed day to day transaction data which keeps changing. For
example, R/3 or any other database.
OLAP(Online
Analytical Processing):
These
systems have data for analysis purpose. The input for this system is from OLTP
systems. The data from the OLTP systems is made use to prepare the data for
analysis purpose.
Before we learn more about SAP BI Architecture, let’s learn
about


Units:


Overview of SAP BI Architecture:
Conceptual Layers of Data Warehousing with BI
Persistent Staging Area
The data
extracted from the Source Systems first enters into the Persistent Staging
Area. The data at this layer is the raw data which is in unchanged form. The
data is consolidated and cleansed only in the next layers.
Staging
area is a temporary table that holds the data and connects to work area or fact
tables. In the absence of staging area the data load will have to go from
the OLTP system to the OLAP system directly which hamper the performance of
OLTP system.
Data Warehouse Layer (DWH Layer)
Data from
the Persistent Staging Area is loaded into the DataWareHouse Layer. It has corporate
information repository. Data in this layer is stored for a longer
period.i.e,Entire History data (for example, last 5 years data) is stored here
in this layer.No aggregation of reporting-relevant data;the granularity of the
data stored in this layer is at line-item (detailed) level.
Operational Data Store Layer
Data is
loaded to an Operational Data Store Layer very frequently on a continuous basis
from the source systems. Hence the data in this layer contains all the changes
to the data that was done throughout the day. Data from Operational data store
later can be loaded to the Datawarehouse layer at particular timings (say end
of the day) to update the date in Datawarehouse Layer. This Operational Data
Store Layer can also be used in case of any emergencies when the data in the
datawarehouse and datamart layers are lost. In such situations data can be
loaded from the Operational Data Store layer to the Data Warehouse Layer and
Data Mart Layer. ODS is not based on star schema model but they are in a flat
files format.
Architected Data Mart Layer
Architected
Data Mart Layer also known as Infocube. It is designed to store summarized and
aggregated Data for long period of time. Data from the Data Warehouse
Layer is loaded into the Architected Data Mart Layer. It is used in Analysis
and reporting. The data is at a high level relevant for creating reports
displaying these data. Data manipulation with business logic is done at this
layer. It consists of a central fact table (Key Figures) surrounded by several
dimension tables, it is used to support BI queries
Key Components of SAP BI System:
Business
Intelligence is a core component of SAP NetWeaver. The figure below shows the
key components of a BI system.
Data warehousing – This is mainly to Extract,
Transform and Load data from Source systems.
BI platform – The BI platform layer contains BI
services to support complex analysis tasks and functions. It contains the
Analytic Engine, which processes the data requested through BEx analysis
navigations. Its interface allows entry and manipulation of data as part of BI
Integrated Planning. It also has special analysis tools such as the Analysis
Process Designer (APD) and the Data Mining which provide analysts at your
company with the tools to merge, mine, pre-process, store, and analyse data.
BI Suite –
These tools helps in creating reports for analysis purpose. It contains the
Business Explorer (BEx) which provides flexible reporting and analysis tools.
The following areas in the Business Explorer
can be used for Data Analyses:
BEx Analyzer
(Microsoft Excel-based analysis tool with pivot-table-like features)
BEx Web Analyzer
(Web-based analysis tool with pivot-table-like features)
BEx Web
Application Designer (customer-defined and SAP BI Content provided)
BEx Report
Designer (highly formatted Web output)
SAP BI Architecture:
BI has
three tier architecture:
Database Server: Where data is physically stored. (
ODS, PSA, Info cube and metadata repository).
Application Server: The application server is based on
the OLAP processor. It is used to retrieve data stored in the database server.
Presentation Server: Manages
reporting and data access.
Data is
extracted from the Source Systems.
Data is
staged at the Persistent Storage Area (PSA). This holds Source like data.
Data is
cleansed, loaded and stored in Data Store Object.
Data is
viewed at multiple dimensions in the Info cube.
Data is
available by the OLAP processor to the Business Explorer to display data as per
Analysis requirements of the Business.
Data can
be made available to SAP/Non-SAP, Data Marts by the Open Hub Service. (Info
Spoke).
All about Info object Info area &
Info object Catalog
What is an Info Objects?
Info-Objects
take information from the source, then adjust and arrange the information into
either a standard or customized report. Info objects are the smallest
available information modules/fields in BI. It is needed in info-providers
like Info Cubes, DSOs, Multi Providers, and Queries etc... These
Info-Providers are made up of Info-objects.
Info-object
gives all information about the business. For instance company ‘XYZ’ is
interested in finding out how much of “product x” shipped on “date x” to
“factory x”. By defining Info-object for specific function like
“0MATERIAL”, “0DATE” and “0LOCATION” all the information can be retrieved.
Info Objects
can be classified into the following types:
Characteristics
(for example, customers)
Key
figures (for example, revenue)
Units (for
example, currency, amount unit)
Time
characteristics (for example, fiscal year)
Technical
characteristics (for example, request number)
Characteristics:
Characteristics
are Business reference objects used to analyze key figures.
Examples
of characteristics Info Objects:
Cost
center (0COSTCENTER)
Material (0MATERIAL)
Key
figures provide the values to be evaluated. They are numeric information that
is reported in the query.
Examples
of key figure InfoObjects:
Quantity
(0QUANTITY)
Amount
(0AMOUNT)
Units:
Units are
paired with Key
figure values . They provide assign a unit of measurement to a Key
Figure Value. For instance 10 Kg where 10 is the KeyFigure and Kg is the unit
Other Examples of Unit Characteristics:
Currency
unit (0CURRENCY) (Holds the currency type of the transaction e.g. $, EUR, USD...)
Value unit
(0UNIT) (or) unit of measure (Hold the unit of measure e.g. Gallon, Inch,
cm, PC)
Time Characteristic:
Time
characteristics give time reference to data.
Examples
of Time Characteristics:
Calendar
day (0CALDAY)
Calendar
year (0CALYEAR)
Fiscal
year (0FISCYEAR)
Technical Characteristics:
Technical
characteristics are SAP standard objects having their own administrative
purposes.
Examples of Technical Characteristics:
Info
Object 0REQUID – While loading data to various data targets, SAP allocates
unique numbers which are stored in this Info object
Info
Object 0CHNGID – When aggregate change run is done, a unique number is
allocated and stored in this info object.
Before
creating an Info Object, Info Area and Info Object Catalog need to be created.
What is an Info Area?
In
Business Warehouse, Info-areas are the branches and nodes of a tree structure.
It is used
to organize info cubes and info objects.
Each
Info-object is assigned to an Info Area.
Info Area
can be thought of as a folder used to hold related files together.
What is Info object Catalog?
Every info
object need to be created within an Info Object Catalog.
It helps
in organization and is no way related to reporting functions.
Example:
There are tons of Info Objects for SAP Financials which can be clubbed into a
Info Object Catalog. This makes management and maintenance easy.
An Info
Object can be assigned to multiple Catalog
There are
2 types of Info Object Catalog.
Characteristic
Info Object Catalog
Key figure
Info Object Catalog
Here is
the Road MAP to create an Info object

How to Create an Info area?
Step 1)
Go to
transaction code RSA1 to go to the Data Warehouse Workbench.
Click the
OK button.
Step 2)
Navigate
to Modeling ->Info Provider
Right
click in the Workbench and Create an Info Area
Step 3)
Enter the
Technical Name
Enter the
Description
Press the
enter button


Step 4)
The Info
Area created appears as shown below.
How to Create an Info Object Catalog
Step 1)
Go to transaction code RSA1 to go to the Data Warehouse
Workbench.
Click the OK button.

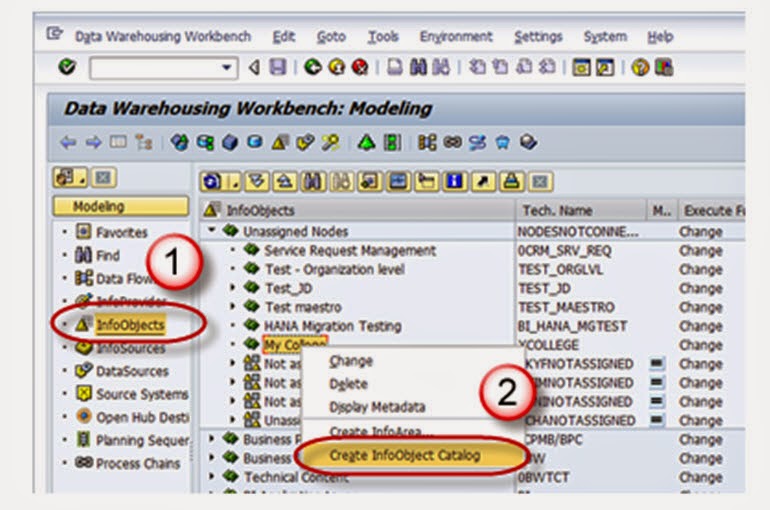


Step 2)
Navigate to Modeling -> Info objects
Right click on the Info Area and choose the option “Create
Info Object Catalog” as shown below
Step 3)
Enter
the Technical name of the InfoObject Catalog.
Enter
the Description of the InfoObject Catalog.
Click in
the “Characteristic InfoObject” option button. This is a characteristic
InfoObject Catalog. Click the Keyfigure option button. Then a Keyfigure
InfoObject Catalog would be created.
Click on
the create button.
Save and
Activate the InfoObject Catalog. The InfoObject Catalog created appears as
shown below.
How to Create an Info Object with Characteristics:
Step 1)
Go to
transaction code RSA1 to go to the Data Warehouse Workbench.
Click the
OK button.
Step 2)
Navigate to Modeling -> Info objects
Right click on the Characteristic Info Object Catalog and
choose the option “Create Info Object” as shown below.
Step 3)
Give Technical name of the characteristics
Give a meaningful Description
Reference Characteristics is mentioned if the new
characteristic to be created has the same technical properties of some other
already existing characteristic.( LCOSTC)
Template is specified if the new characteristic to be
created has some of the technical properties of an already existing
characteristic. (LCOSTC)
Hit the enter button.
On
completion of the above step, it takes you to the “Edit Screen” of the
Infoobject. The Infoobject “Edit Screen” has 6 Tab pages listed below.
General
Business
Explorer
Master
Data/Texts
Hierarchy
Attribute
Compounding
Let us see
each of the tab pages individually.
Tab Page: General
In this
Tab Page, enter the following
The
Technical name of the InfoObject
Enter the
long and short description
Enter the
data type
Enter the
length.
All other
settings in this tab and other tabs are optional.
Tab Page: Business Explorer
Each and every setting in the Business Explorer tab page is
to set default values in the Business Explorer.
The Display:”Text” setting on this page decides whether the
value of the characteristic is displayed as a textual description or as a key
in the Business Explorer.
Tab Page: Master Data/Texts
The Check
box “With Master Data checkbox” and/or “With Texts” has to be selected for
Master Data bearing Infoobject. By selecting any of these checkboxes, the
characteristic is designed to bear master data and it has its own master data
tables.
If the
characteristic needs its own texts, you need to make at least one text
selection. The text can be short, medium or long text with 20, 40, or 60
characters respectively.
In the
screen shot shown below, the Characteristic has master data table (With master
data check box is checked) but does not have Text table (With Texts is
unchecked).
Tab Page: Hierarchy
A
hierarchy indicates a parent-child relationship which consists of several nodes
and leaves.
On the
Hierarchy tab page, you determine whether or not the characteristic can have
hierarchies and, if so, what properties these hierarchies are allowed to have.
If the “With”
hierarchies checkbox is checked, hierarchies can be created for this
characteristic. In the below screen shot, the check box is unchecked, hence no
hierarchy is created for this info object.
Hierarchy
can be created manually or loaded from the SAP system or other non sap source
systems. Hierarchy can be used to drill down or extract specific information
about the business item.
Example: A
real time scenario when Hierarchy can be used is as follows,
Assume in
the case of a bank, the relationship between the main bank and the various
branches under a bank can be maintained in the form of hierarchy. Where you can
extract the information of customer details at any branch about its account,
loan, due dates for loan payment and so on.
Tab Page: Attributes
Attributes
are nothing but the fields or properties of master data, there are different
types of attributes like display attributes, navigational attributes, executive
attributes, compound attributes and so on.
You
determine whether or not the characteristic can have attributes or texts. The
attributes are assigned to the characteristic on the Attributes tab
page. Several characteristics can be added as attributes of the master
data characteristics in the Attribute tab page.
Attributes
can be marked as navigational or display attribute by clicking on “navigational
attribute on/off” button.
If you
define attributes as display attributes, you can use these attributes only
as additional information in reporting when combined with the characteristic.
If you
define attributes as navigation attributes, you can use them to navigate
in reporting. When a query is executed, the system does not distinguish between
navigation attributes and characteristics for an Info Provider.
In the
example below, company code is navigational.
Display
and navigation attributes can be marked as time-dependent if a
validity period is required for each attribute value.
Tab Page: Compounding
On this
tab page, you determine whether or not the characteristic is to be compounded
to other Info Objects. You often need to compound characteristic values to
enable characteristic values to be uniquely assigned. Some Info-objects cannot
be defined without compounding, also in order to map the data-model you have to
compound Info-Objects sometime. If the info-object is defined as an attributes,
it cannot be included as compounding object.
Say, for
example, cost center 1000 stands for sales and distribution in controlling area
10, and it also stands for sales in controlling area 20. In this case, you
would define a cost center to controlling area characteristic Compounding.
now save & activate the info object.
How to Create Info Objects With Key Figures
Go to RSA1
-> Modeling ->Infoobjects
Right
click on the Infoarea -> Click on Create Infoobject catalog for Key Figures.
Activate the Keyfigure Infoobject Catalog.
Now Click
on Infoobjects catalog -> Create Infoobject
Give
Technical name of the Keyfigure.
Give a
meaningful Description
Reference
Keyfigure is mentioned if the new Keyfigure to be created has the same
technical properties of some other already existing Keyfigure. In this case the
already existing Keyfigure(Technical name is mentioned here).
Template
is specified if the new Keyfigure to be created has some of the technical
properties of an already existing Keyfigure. In this case the already existing
Keyfigure (Technical name is mentioned here).
Hit the
enter button.
On
completion of the above step, it takes you to the Edit screen of the keyfigure
Infoobject. The keyfigure Infoobject Edit screen has 3 Tab pages listed below.
Type/unit
Aggregation
Additional
Properties
Let us see
each of the tab pages individually.
Tab Page: Type/unit
On this tab
page, you determine the key figure type (amount, quantity etc), the data type
and the currency/quantity unit.
If you
choose key figure type amount or quantity, you must assign a currency or
quantity unit to this key figure.
For key
figure type Amount, you can choose between a fixed currency (USD, for example)
or a variable currency, (0CURRENCY, for example).
For key
figure type Quantity, you can choose between a fixed quantity unit such as KG,
or a variable quantity unit such as 0UNIT.
Tab Page: Aggregation
An
aggregate is a materialized, summarized view of the data in an Infocube. In
other words, it consolidates and stores a subset of infocube data into a
database. When query is executed on an infocube with appropriate
aggregates the query reads the summarized data directly from the database. It
is also referred as baby-cube of Info-cube. It is recommended to use
aggregates, if an infocubes contains lots of data.
Aggregation
rules are set on this tab page for the key figure's behavior when data gets
stored in tables in BI and in BEx reports.
Aggregation
In the
Aggregation field, you specify the function (SUM/MAX/MIN) that determines the
way in which the key figure is aggregated.
Exception Aggregation
In the
Exception Aggregation field, you specify the function (last value, first value,
max, or min) that determines the way in which the key figure is aggregated
using the reference characteristic for exception aggregation in the Business
Explorer.
Reference Characteristic for Exception Aggregation
In the
Reference Characteristic for Exception Aggregation field, you choose the
characteristic with reference to which the key figure is aggregated with
exception aggregation. Generally, this is a time characteristic.
Cumulative/noncumulative values
A
noncumulative value is a non-aggregating key figure, on the level of one or
more objects that is always displayed in relation to time.
Tab Page: Additional Properties
This tab
page is primarily used to change default settings for the key figure display
type (number of decimal places, display scaling etc.) in Business Explorer
(BEx).
It also
allows you to set Key Figure with Maximum Precision, which internally processes
calculations involving this key figure with more decimal places, thus reducing
rounding errors, but at the cost of reduced speed.
Finally save & activate key figure.
What Is DSO? Why Use It?
A Data
Store object (DSO) is a two dimensional storage unit which mainly stores
consolidated and cleansed transaction data or master data on a lowest
granularity.
It is a
two dimensional Transparent Table.
Data is
stored at detailed level.
With DSO,
it is also possible to overwrite data fields.
Detailed
level reporting can be obtained from a DSO.
Why use DSO?
Let’s take
an example of Sale order Data, which has to be extracted from SAP R/3 system (OLTP:Online
Transaction Processing data which keeps changing) into BI. The Sales Orders
created in the R/3 system could be edited at any point of time after creation
of the record. Initially when sales order records are created in R/3, these
records are extracted into BI. Once the records are changed in R/3, the changes
need to be made in BI.
Data is
extracted from SAP R/3 system and loaded into Data Store Object.
Initially,
records are stored in New Status in the DSO. Records are stored in the New
Table.
Once the
DSO data is activated, data is stored in the Active table.The New Table does
not hold that data anymore.
When
records are changed in R/3, for these changes to reflect in BI, the changes are
extracted into the DSO.
Now the
data is stored in the new table until the DSO contents are activated. The Data
has to be further loaded into Info cube from which reports are being delivered.
DSO has
Overwrite and additive functionalities.If all characteristics are same, key
figures are aggregated/overwritten based on the functionality chosen.
Cube is
additive in nature. If all characteristics are same, key figures are
aggregated.
Types of DSO
DSOs can
be classified into the following types:
Standard
DSO
Direct
Update DSO
Write-Optimized
DSO


If we select the check box, Duplicate records are loaded as a new record. There is no relevent of semantic keys in this case.


What Is Standard DSO? How to Create One?
A standard
DSO has three transparent tables on the database.
Activation Queue: Holds the records that are to be
updated, not yet been activated.
Active Data: Table
which holds active data.
Change Log: Holds
the change history for delta loads.
Process of Data transfer to DSO
Data gets
first loaded into the activation Queue also called the new data table.
Data upon
“Activation” is transferred from new data table to Active data table
And then
to Change log table. In change log table you can have the changed data or
corrected data.
Note: the
data in Change log table is redundantly stored and can be deleted after the
records have been activated.
Creation of Standard DSO:
Step 1)
Go to transaction code RSA
Click the OK button.
Step 2)
Navigate to Modeling tab->InfoProvider.
Right click on InfoArea.
Click on “Create DataStore Object” from the context menu.
Step 3)
Enter the Technical Name.
Enter the Description.
Click on the “Create” button.
Settings in DSO:
Type of Data Store Object: This option can be used to change
the type of DSO. By default, Standard DSO would be chosen. This can be changed
to Write optimized or Direct Update DSO.
SID Generation upon Activation: Generated the Surrogate ID
(SID) for each master data value, when this option is checked.
Unique Data Records: This
option can be used when the DSO will never hold duplicate values.
Set Quality Status to “OK” Automatically: This setting
sets the Quality status after the data loading has been completed.
Activate Data Automatically: DSO activation is automated by
using this setting.
Update Data Automatically: Data loaded in the DSO can be
automatically loaded to target objects using this setting.
Including Key Fields and Data Fields in the DSO:
DSO contains 2 kinds of fields
Key field
Data field
Key field is used to make the records unique. Other fields
can be included as data fields in the DSO,
Step 1)
Right Click on “Key fields” and choose the option “Info Object
Direct Input”.
Step 2)
The following pop-up opens. Here you can input the technical
names of the InfoObjects you have to include and press enter.
Below shown is the Key fields added in the DSO.
Step 3)
Navigational Attribute would be viewed in the DSO by
default, but the check box to ON/OFF Navigational has to be chosen if it is to
be used in reporting.
Step 4)
The DSO structure design is complete. Activate the DSO by
clicking on the Activate button.
What Is Write Optimized DSO? How to Create One?
Write Optimized DSO is used when a Data storage object is
required for storing lowest granularity records such as address and when
overwrites functionality is not needed. It consists of the table of active data
only, hence no need for data activation which increases data process. Data
store object is available immediately for further processing; it is used as a
temporary storage area for large set of data.
Write-Optimized DSO has been primarily designed to be the
initial staging of the source system data from where the data could be
transferred to the Standard DSO or the Info Cube.
PSA receives data unchanged to the Source system
Data is posted at document level, after loading in to
standard DSOs data is deleted
Data is posted to corporate memory write –optimized DSO from
pass thru write-optimized DSO
Data is distributed from write-optimized “pass thru” to
Standard DSOs as per business requirement
Write Optimized DSO Properties:
It is used for initial staging of source system data.
Data stored is of lowest granularity.
Data loads can be faster since it does not have the separate
activation step.
Every record has a technical key and hence aggregation of
records is not possible. New records are inserted every time.
Creation of Write-Optimized DSO:
Step 1)
Go to transaction code RSA1
Click the OK button.
Step 2)
Navigate to Modelling tab->Info Provider.
Right click on Info Area.
Click on “Create Data Store Object” from the context menu.
Step 3)
Enter the Technical Name.
Enter the Description.
Click on the “Create” button.
Step 4)
Click on
the Edit button of “Type of DataStore Object”.
Step 5)
Choose the Type “Write-Optimized”.
Technical
keys include Request ID, Data package, Record number. No additional objects can
be included under this.
Semantic
keys are similar to key fields, however, here the uniqueness is not considered
for over write functionality. They are instead used in conjunction with setting “Do
not check uniqueness of data”.
The Purpose
of Semantic Key is to identify error in incoming records or Duplicate records .
Duplicate
Records are written into error stack in the subsequent order. These records in
the error stack can be handled or re-loaded by defining Semantic Group in DTP.
Semantic
Groups need not be defined if there will be no possibility of duplicate records
or error records.
If we select the check box, Duplicate records are loaded as a new record. There is no relevent of semantic keys in this case.
Step 6: Activate the DSO
What Is Direct Update DSO? How to Create One?
Standard DSO differs from Direct update DSO in terms of how
data is processed.
In Standard DSO, data is stored in different versions
Active, Delta, Modified
Whereas Direct Update DSO contains data in single version.
Data is stored precisely in same form in which it is written to DSO consists of
Active Data Table for direct update by the application. It retrieves its data
from external systems via fill or delete APIs.
The Following APIs exists:
RSDRI_ODSO_INSERT: This API is used to insert new data which
does not exist in the system.
RSDRI_ODSO_INSERT_RFC: This is similar to the API
“RSDRI_ODSO_INSERT” except that this API can be called remotely.
RSDRI_ODSO_MODIFY: This API is used to modify existing
records. If a new record comes in, the record is inserted.
RSDRI_ODSO_MODIFY_RFC: This is similar to the API
“RSDRI_ODSO_MODIFY” except that this API can be called remotely.
RSDRI_ODSO_UPDATE: This API is used to modify existing
records.
RSDRI_ODSO_UPDATE_RFC: This is similar to the API
“RSDRI_ODSO_UPDATE” except that this API can be called remotely.
RSDRI_ODSO_DELETE_RFC: This API is used to delete records.
Direct Update DSO – Properties
DSO for direct update contains data in a single version.
Therefore, data is stored is in precisely the same form in which it was written
by the application
Records with the same key are not aggregated
SIDs cannot be generated
Data from it can be updated to additional info providers.
The DSO for direct update is available as an Info Provider
in BEx Query Designer and can be used for analysis purposes.
It is an additional function that can be used in special
application contexts.
To load data quickly without using the extraction and load
processes in the BI system.
Can be used as data target for an analysis process.
Direct Update DSO – Functionality
Can Update the Direct Update DSO data in to additional info
providers.
Can be used as an info provider for Bex Query Designer and
can be used for analysis process.
Advantage:
It is structured in a way to access data easily.
Data is made available for analysis and reporting
immediately after it is loaded.
Drawbacks
The loading process is not supported by the BI system (Data
Sources do not provide the data).
Therefore DSOs are not displayed in the administration or in
the monitor.
Since a change log is not generated, we cannot perform a
delta update to the Info Providers.
Creation of Direct Update DSO:
Step 1)
Go to transaction code RSA1
Click the OK button.


 step 6:
Enter the name of the DSO.
Click Continue button.


Step 2)
Navigate
to Modelling tab->Info Provider.
Right
click on Info Area.
Click on “Create Data
Store Object” from the context menu
Step 3)
Enter the Technical Name.
Enter the Description.
Click on the “Create” button.
Step 4)
Click on the Edit button of “Type of Data Store Object”.
Step 5)
Choose the Type “Direct Update”.
Step 6)
Activate the DSO.
What is InfoSet?
Infoset is
a special kind of Infoprovider which does not store data physically. In other
words, Infoset are InfoProviders that logically join data and provide this data
for BI queries. Infoset collects data from the tables of InfoProviders used to
build it. Infoset describes data sources that are defined as a rule of
join on Datastore objects, Info-objects or standard InfoCubes.
When to Use Infosets?
To join
required data from basic InfoProviders
To allow
BEx Reporting on a DataStore object without turning the BEx Reporting indicator
on
To
evaluate time dependencies
To create
self joins and left outer joins
What are Info Set Joins?
DSO (Data
Store Objects) and/or Info Objects (characteristics with master data) are
connected in the Info Set using join conditions. The joined data from the Info Sets
are available for access from Business Explorer Queries. Info Sets allows you
to report on several Info-Providers (Info cubes, Data Store objects, master
data Info Objects), but they contain no data. With activated Info sets, you can
define queries in the BI suite.
Joins are classified into four categories:
Inner Join
Left Outer Join
Temporal Join
Self-Join
Inner Join: A record can
only be in the selected result set if there are entries in both joined tables.
If table 2 has corresponding records of table 1, by
comparing a key field (EMPNO in the below example), only those records would be
part of the result set. The result set would have the fields of table 1 and
table 2 filled in from the corresponding fields.
Example:
Left Table
(Table 1)
EMPNO
|
LASTNAME
|
000020
|
THOMPSON
|
000250
|
SMITH
|
000100
|
SPENSER
|
Right
Table(Table 2)
EMPNO
|
PROJNO
|
000020
|
AD3112
|
000100
|
OP2010
|
000150
|
PL2100
|
Inner Join
Result
EMPNO
|
LASTNAME
|
PROJNO
|
000020
|
THOMPSON
|
AD3112
|
000100
|
SPENSER
|
OP2010
|
Left Outer
Join: If table 2 has corresponding records of table 1, by comparing a key
field (EMPNO in the below example), those records would be part of the result
set. The result set would have the fields of table 1 and table 2 filled in from
the corresponding fields.
If table 2
has no corresponding record when compared with table 1, those records of table
1 is also part of the result set (fields belonging to table 2 will have initial
values). This is shown in the example below.
Left
Table(Table 1)
EMPNO
|
LASTNAME
|
000020
|
THOMPSON
|
000250
|
SMITH
|
000100
|
SPENSER
|
Right Table
(Table 2)
EMPNO
|
PROJNO
|
000020
|
AD3112
|
000100
|
OP2010
|
000150
|
PL2100
|
Left Outer
Join Result
EMPNO
|
LASTNAME
|
PROJNO
|
000020
|
THOMPSON
|
AD3112
|
000250
|
SMITH
|
|
000100
|
SPENSER
|
OP2010
|
Temporal Join: A join is called temporal if at
least one member is time-dependent.
Self-Join: The same object is joined together.
Creation of Info set:
Step 1)
Go to
Transaction Code RSA1
Click the
“Ok” button
Step 2)
Browse to
the tab “InfoProvider”
Right-Click
on the infoarea and choose the option “Create Infoset” from the context menu.
Transaction
RSISET can also directly be used to create InfoSet.
When the
Info Set Builder is called for the first time, the below two display mode
options as
Network
(Dataflow Control)
Tree (Tree
Control).
The
network display is clearer.
The tree
display can be read by the Screen Reader and is suitable for visually-impaired
users.
You can
change this setting at any time using the menu path Settings -> Display.
Step 3)
Enter the
Technical Name
Description
In the Start
with Info Provider section, you determine which Info Provider you want to
use to start defining the Info Set. Select one of the object types that the
system offers you:
Data Store
object
Info
Object
Standard
Info Cube
Choose an
object.
If you
want to choose an Info Object, it must be a characteristic with master data.
The system provides you with the corresponding input help.
Choose
Continue button.
. Step 4)
The Change
Info Set screen appears.
Step 5)
Select the insert Info provider button shown below, to
choose the infoprovider with which data is to be joined.
Enter the name of the DSO.
Click Continue button.
The below
screen appears with the 2 info providers selected.
Step 7)
Activate the Info set by clicking on the activate button.
What Is an Infocube? How to Create One?
What is Infocube?
Infocube
is data storage area in which we maintain data which we are extracting from
source system physically. An InfoCube can function as both a data target
and an InfoProvider. From a reporting point of view, an Infocube can be
described as a self-contained dataset.
For
example, a Sales Amount Infocube which has dimensions like MONTH –
PRODUCT-CUSTOMER-REGION, can be viewed by any of the axes, for example total
sales by region or by customer. The dimensions of an Info-Cube are entities or
hierarchies.
BIW (Business
Intelligence Warehouse) provides facility to define 16 dimensions, out of which
3 are pre-defined.
The above cube demonstrates a simple 3 dimensional cube.
Each dimension can hold 248 characteristics for analysis. One square in the
cube above, represents the relative value for the corresponding
customer/region/division combination.
InfoCube Structure:
An Infocube follows the Extended Star Schema.
It has Fact table at the center and is surrounded by 16
dimension tables with Master data lying outside the cube.
Infocubes are the central multidimensional data model in BI.
It is a self-enclosed data set encompassing one or more
related business processes. A reporting user can define or execute queries
against an info cube.
It is used to store summarized / aggregated data for long
periods of time. Infocubes consist of precisely one fact table surrounded by
dimensional tables.
SAP delivered Infocubes begins with a number usually 0. Your
own Infocube should begin with a letter from A to Z and that it should be 3 to
9 characters in length.
Type of Info Cube
Infocube is classified in to three types based on the way of
maintaining and distributing the data.
Standard Infocube:Used to maintain the data physically in
the cube. Read only is possible.
Virtual Infocube: It does not maintain data
physically in the cube .During the query execution it brings the data from
respective source system.
Real Time Infocube: Stores the data physically in the
cube.Read and Write are possible. It is significantly used in planning the
data.
How to Create Standard Infocube
Step 1)
Create Info Cube
Go to transaction code RSA1
Click the OK button.
Step 2)
Navigate to Modeling tab->InfoProvider.
Right click on InfoArea.
Click on “Create InfoCube” from the context menu.
Step 3)
Enter the
Technical Name.
Enter the
Description.
Choose the
option button “Standard InfoCube”.
Click the
create button.


Step 4)
Right Click on Dimension 1 -> Properties.
Step 5)
Rename the Dimension as per Info object information.
Step 6)
Right click on the Dimension ->InfoObject Direct Input to
Insert InfoObjects into the Dimension.
Step 7)
Select Characteristics.
Step 8) Select Airline ID in characteristics.
Drag and drop it into Dimension.
Step 9)
Similarly create new dimensions and follow the steps 4-8 to
add the InfoObjects.
Step 10)
Adding Key figureInfoObjects in the Infocube
Step 11)
Follow the proesses above to add more Key Figures
Step 12)
Activate the Infocube.
Infocube Additional Points:
The technical name of the dimensional table is assigned by
the system, using the pattern /BIC/ “D#”, where the first
# will be a1, the second a 2, and so on.
If it is a sap delivered cube, then it would begin as /BI0/D
Characteristics Infoobjects can be freely added to
customer-created dimensions.
Dimension Tables should be used optimally.
Ensure optimum cardinality while adding characteristics
infoobject to dimensions.E.g. A departmental store has 10,000 customers
and 1000 different materials. The cardinality is m:n, which means each
customer can buy many materials. Such kind of cardinality should not be
maintained in the same dimension table.
Thumbrule: Avoid m: n within a dimension.
Dos
Navigate to Modeling tab->InfoProvider.
Right click on InfoArea.
Click on “Create InfoCube” from the context menu.
Enter the Technical Name.
Enter the Description.
Choose the option button “Standard InfoCube”.
Don’ts
Standard Infocube can be used if user:
Wants to facilitate multi-dimensional analysis.
Wants to store summarized / aggregated information with
large volume of data.
Use line item dimension if only one object is placed in a
dimension table.
Maintain high granularity of records.
Group M: N cardinality within the same dimension.
Give more attention on bring the character information
through navigational attribute.
Maintain high cardinality information in dimensional table.
How To Load Master Data From Flat File?
We will learn the load with the help of a scenario -
Load Master data to InfoObject ZMAT (Material Number) which
has the attribute, ZMAT_NM (Material Name. Below are detailed Steps to Load da
Step 1) Create source system for flat file.
Go to transaction code RSA1
Click the OK button.
In the next screen,
Navigate to Modeling tab->Source Systems.
Right click on the folder named FILE and choose “Create”
from the context menu.
In the next screen,
Enter the Logical System Name.
Enter the Description.
Click Continue Button.
Step 2) Create Application component.
Navigate to Modeling tab->Data Sources.
Choose the Source System.
Right click -> Create Application Component.
Enter the Technical Name.
Enter the Description.
Click Continue.
Navigate to Modeling tab->Data Sources.
Right click -> Create Data Source
Enter Technical Name.
Choose the DataType DataSource.
Click Continue.
Enter the Fields shown below. This Structure should be the
same as the DSO to which transaction data is to be loaded.
In the Extraction tab, choose the Adapter as “Load Text-Type
File from Local Workstation”.
Choose the file path where the flat file to be loaded is placed
in the system and activate data source.
Click Save.
Step 3) Create transformation between Data Source(Source)
and InfoObject Attribute(Target).
Right click on the DataSource -> Create Transformation
In the next screen,
Enter Target Object Type.
Enter Target Object Name.
Enter the SubType
Click Continue.
The transformation would be created with automatic mapping
of the Source fields to the Target fields.
Right-Click on DTP folder and choose the option “Create Data
Transfer Process” from the context menu.
Below screen shows the DTP created.
Step 4) Create Infopackage and Schedule dataload to the
DataSource(PSA).
Enter RSA1 in command prompt
Hit Enter
Navigate to Modeling tab->DataSources.
Right click on the DataSource -> Create InfoPackage.
Enter the InfoPackage Description
Click Save.
Click on Schedule tab.
Click Start button to start the load from the flat file to
the Data Source.
Step 5) Load data to the DSO.
Click Execute tab in the DTP.
Click the Execute Button to start data load from the
DataSource(PSA) to the DSO.
How To Load Transaction Data From Flat File
We will learn how to load transactional data from a Flat File with the help of a scenario.
Scenario: Load data to the DSO named “DEMO_DSO”. The DSO has the following fields.
Key Fields:
ZCUST - Customer
ZMAT – Material
Data Fields:
ZPRICE – Material Price.
ZQTY - Quantity.
Lets look into the Steps to Load data to DSO from Flat file
Step 1) Create source system for flat file.
Go to transaction code RSA1
Click the OK button.
In the next screen,
Navigate to Modeling tab->Source Systems.
Right click on the folder named FILE and choose “Create”
from the context menu.
In the next screen,
Enter the Logical System Name.
Enter the Description.Click Continue Button.
Step 2) Create Application component.
Go to transaction code RSA1
Click the OK button.
Navigate to Modeling tab->Data Sources.
Choose the Source System.
Right click -> Create Application Component.
Enter the Technical Name.
Enter the Description.
Click Continue.
Step 3) Create Data Source.
Go to transaction code RSA1
Click the OK button.
Navigate to Modeling tab->Data Sources.
Right click -> Create Data Source.
Enter Technical Name.
Choose the DataType DataSource.
Click Continue.
No comments:
Post a Comment